#44 A scalable pipeline for ChIP calling on 10k MVP WGS datasets
Successful implementation of Mutect2 on GCP
Mutect2, a variant caller from the GATK suite of tools, was successfully implemented on Google Cloud Platform (GCP) for the purpose of identifying ChIP mutations within MVP WGS data. Performance evaluation was conducted on datasets of varying sizes, including 100, 1000, and 10,000 CRAM files.
This paper describes the ChIP calling on WGS data in more detail.
Performance and cost
The latest GATK container image (broadinstitute/gatk:latest) was used to deploy the tool on cloud. The runtime for Mutect2 ranged from 1.4 to 2.5 minutes, with an average runtime of 1.8 minutes per sample. This translates to a cost of approximately $60 calculated through GC pricing calculator for 10,000 samples using a n1-standard-1 machine type with a 10GB boot disk size (us-west1b region).
Data requirements and availability
The analysis pipeline requires several reference files. The germline reference and its corresponding index are located within the GATK best practices bucket. Additionally, the reference FASTA, FAI, and DICT files can be accessed from the GCP Broad institute bucket. Finally, the list of ChIP driver genes was obtained from Alex and team and stored under the project bucket.
ChIP calling workflow
A five-step approach has been employed for ChIP mutation calling from WGS data:
1. Mutect2:
The mutect2 command is written as a shell script and provided as one of the inputs for the dsub job. The complete paths to all of the input files, references and output files are provided in a tab-separated file, where each line correponds to a single task. The outcome is that we have a single job-id with multiple tasks. Progress of each task was monitored from the command line through dstat and from the log files generated. To optimize resource utilization, the project enforces a limit on the number of concurrently running jobs. When this limit is reached, new jobs are queued and completed as and when resources become available.
Mutect2 command:
#!/bin/bash

#Extract file name
export CRAM_NAME="$(basename $CRAM .cram).vcf"

# Run Mutect2
gatk Mutect2 \
    -I $CRAM \
    -L $CHIP_GENES \
    -R $REF \
    --germline-resource $GERM_RES \
    --genotype-germline-sites \
    -O "$(dirname "${OUTPUT}")/${CRAM_NAME}"
The resulting VCF files, containing identified variants and associated information, are automatically deposited by the dsub script into designated GCS buckets for subsequent analysis.
2. Filtering:
Post running Mutect2, a filtering step was implemented to filter the identified variants. This step uses a custom script executed on a VM provisioned within the same GCP project. The script leverages gsutil to download the VCF files generated by Mutect2 from a designated GCS bucket. A temporary directory (/tmp/vcf_filtering) was created on the VM to store the downloaded VCFs and the filtered outputs.
The script iterates through each VCF file, employing bcftools filter to apply stringent quality control criteria. These criteria focus on two key aspects: The first filter, (MIN(FORMAT/DP)<20), removes variants with a minimum Depth of Coverage (DP) below 20. This ensures a minimum number of reads supporting the variant call for increased confidence. The second filter, (MIN(FORMAT/F1R2)<1) || (MIN(FORMAT/F2R1)<1), targets variants with discordant mapping qualities between the forward and reverse reads. The FORMAT/F1R2 and FORMAT/F2R1 tags represent the mapping quality scores for the forward and reverse reads, respectively. By requiring a minimum value of 1 for either tag, the script filters out variants where both the forward and reverse reads have low mapping quality scores (less than 1).
The filtered variants are then piped through bgzip for compression and saved as gzipped VCF files with a “filtered_” prefix appended to the original filename within the temporary directory. Finally, the script uploads the filtered VCF files back to a designated GCS bucket using gsutil. The temporary directory is then removed from the VM.
Script to filter out variants from VCF:
#!/bin/bash

# Google Cloud Storage bucket path where VCF files are stored
BUCKET_PATH="gs://PATH/TO/Output"

# Temporary directory for downloading and filtering
TEMP_DIR="/tmp/vcf_filtering"

# Ensure the temporary directory exists
mkdir -p "$TEMP_DIR"

# Download VCF files from GCS bucket
echo "Downloading VCF files from GCS..."
gsutil -q -m cp "$BUCKET_PATH/*.vcf" "$TEMP_DIR"

# Filter each file using bcftools filter
echo "Filtering VCF files..."
for vcf_file in "$TEMP_DIR"/*.vcf; do
    # Extract the base filename without directory path
    base_filename=$(basename "$vcf_file")
    bcftools filter -e '(MIN(FORMAT/DP)<20) || (MIN(FORMAT/F1R2)<1) || (MIN(FORMAT/F2R1)<1)' "$vcf_file" | bgzip -c > "$TEMP_DIR"/filtered_"$base_filename".gz
done

# Upload filtered files back to GCS bucket
echo "Uploading filtered VCFs back to GCS..."
gsutil -q -m cp "$TEMP_DIR"/filtered*.vcf* gs://PATH/TO/filtered_output

# Clean up temporary directory
echo "Cleaning up temporary files..."
rm -rf "$TEMP_DIR"

echo "Success"
3. Indexing:
Following the VCF filtering step, an indexing process is implemented on the same VM. This step uses the tabix tool to create index files for the filtered VCFs. The custom script automates the indexing process by iterating through each downloaded, compressed VCF file (.vcf.gz extension) stored within a temporary directory (/tmp/vcf_indexing) on the VM. The resulting index file shares the same filename as the VCF but with a .tbi extension appended. After indexing all VCFs, the script uploads the indexed VCF files back to the designated GCS bucket and removes the temporary directory.
Script to index the VCF:
#!/bin/bash

# Google Cloud Storage bucket path where VCF files are stored
BUCKET_PATH="gs://PATH/TO/filtered_output"

# Temporary directory for downloading and indexing
TEMP_DIR="/tmp/vcf_indexing"

# Ensure the temporary directory exists
mkdir -p "$TEMP_DIR"

# Download VCF files from GCS bucket
echo "Downloading VCF files from GCS..."
gsutil -q -m cp "$BUCKET_PATH/*.vcf.gz" "$TEMP_DIR"

# Index each downloaded VCF file using tabix
echo "Indexing VCF files..."
for vcf_file in "$TEMP_DIR"/*.vcf.gz; do
    tabix -p vcf "$vcf_file"
done

# Upload indexed files back to GCS bucket
echo "Uploading indexed VCFs back to GCS..."
gsutil -q -m cp "$TEMP_DIR"/*.vcf.gz* gs://PATH/TO/*.tbi

# Clean up temporary directory
echo "Cleaning up temporary files..."
rm -rf "$TEMP_DIR"

echo "Success"
4. Merging and Normalization:
This step employs bcftools for both merging and normalization of the filtered VCFs.
-
Merging: The process of merging takes several VCF files and combines them into a single, larger VCF file. The below script performs the merging process in stages to address potential limitations with handling a large number of VCFs simultaneously. It first utilizes the split command to divide the filtered VCF files into groups of 500 each. These groups are stored in files with the prefix
subset_vcfs. Within each subset file (subset_vcfs*), the script utilizesbcftools mergeto combine the VCFs. The-0option specifies that all samples should be included in the merged VCF, and-l $irefers to the list of VCF files within the current subset. The resulting merged VCF is saved with the filenamemerge.$i.vcf.gz. -
Normalization: Following merging,
bcftools normis used for normalization. It ensures consistent formatting and data representation across the VCF, potentially addressing variations introduced by different variant callers or sequencing platforms. The-m -anyoption instructs bcftools norm to consider all samples during normalization, and-f $referencespecifies the reference genome (Homo_sapiens_assembly38.fasta). The normalized VCF is then piped throughbgzipfor compression and saved as10k_merge.norm.$i.vcf.gz. Finally,tabix -p vcfcreates an index file for the normalized VCF. The10k_merge.norm.$i.vcf.gzis then uploaded back to the designated bucket and all temporary files are removed.
Script to merge and normalize the VCF:
#!/bin/bash

#Create new directory to download VCF
mkdir merged_vcfs

# Set bucket name, local directory, and reference genome path
bucket_name="gs://PATH/TO/Output"
directory="merged_vcfs"
#Ensure reference file is in local folder
reference="Homo_sapiens_assembly38.fasta"

# Download all VCF.gz files from GCS bucket
echo "Downloading VCF files from GCS..."
gsutil -q -m cp "${bucket_name}"/*.vcf.gz "${directory}"
gsutil -q -m cp "${bucket_name}"/*.vcf.gz.tbi "${directory}"

#Step 1 - Merge VCFs in subsets of 500
echo "Merge, normalize and index VCF files in groups of 500..."
ls "${directory}"/filtered_*.vcf.gz | split -l 500 - subset_vcfs
for i in subset_vcfs*;
do
bcftools merge -0 -l $i -o "${directory}"/merge.$i.vcf.gz
bcftools norm -m -any -f "${reference}" "${directory}"/merge.$i.vcf.gz | bgzip -c > "${directory}"/merge.norm.$i.vcf.gz
tabix -p vcf "${directory}"/merge.norm.$i.vcf.gz
done

#Step 2 - Merge subsets of 500 into 1 main VCF
echo "Merge, normalize and index the subset VCFs to one final VCF..."
ls "${directory}"/merge.norm*.vcf.gz > "${directory}"/merge.txt
bcftools merge -0 -l "${directory}"/merge.txt -o "${directory}"/10k_merged.vcf.gz
bcftools norm -m -any -f $reference "${directory}"/10k_merged.vcf.gz | bgzip -c > "${directory}"/10k_merged_norm.vcf.gz
tabix -p vcf "${directory}"/10k_merged_norm.vcf.gz

#Upload the final merged VCF to GCS
echo "Uploading final merged normalized VCF to GCS..."
gsutil cp "${directory}"/10k_merged_norm.vcf.gz gs://PATH/TO/10k_merged_norm.vcf.gz

#Delete all intermediate files
rm -r "${directory}"
rm subset_vcf*
echo "Success"
5. Annotating the Merged VCF:
The final step involves enriching the merged VCF (10k_merged_norm.vcf.gz) with additional functional information using ANNOVAR.
Step 1 - The main goal of this step is to translate the variant information from the merged and normalized VCF file into a format that ANNOVAR can readily understand and utilize for enriching the variants with additional functional annotations. The main script used here is convert2annovar.pl.
Some important parameters in this step are:
-allsample: This ensures that all samples present in the original VCF are included during the conversion process.
-withfreq : This instructs the script to incorporate allele frequencies (if available in the VCF) into the converted file.
-include 2: This instructs the script to include the second column, which typically represents the reference allele, in the output.
The command would be as follows:
perl /home/pvembu_stanford_edu/workdir/annovar/convert2annovar.pl \
    -format vcf4 10k_merged_norm.vcf.gz -outfile annovar_10k.input \
    -allsample -withfreq -include 2> annovar_10k.log
Step 2 - This final step represents the core of the annotation process using ANNOVAR. Here, the script table_annovar.pl takes center stage, aiming to enrich the converted VCF file (annovar_10k.input) with functional annotations.
Some important parameters in this step are:
/home/pvembu_stanford_edu/workdir/annovar/humandb/ : This specifies the directory containing the annotation databases you potentially downloaded earlier (e.g., knownGene, cosmic70).
-remove : This instructs the script to remove intermediate files generated during the annotation process, helping to manage storage space.
-protocol refGene,knownGene,cosmic70 : This comma-separated list specifies the annotation databases you want to utilize for enriching your variants.
The command would be as follows:
perl /home/pvembu_stanford_edu/workdir/annovar/table_annovar.pl annovar_10k.input \
    /home/pvembu_stanford_edu/workdir/annovar/humandb/ -buildver hg38 -out annovar_10k.output \
    -remove -protocol refGene,knownGene,cosmic70, -operation g,g,f -nastring . \
    -otherinfo 2>> annovar_10k.log
After running the second perl command, the last few lines of the annovar_10k.log are:
NOTICE: the –polish argument is set ON automatically (use –nopolish to change this behavior) Error: the required database file /home/pvembu_stanford_edu/workdir/annovar/humandb/hg38_knownGene.txt does not exist
Currently this is where we are and after speaking with Alex and team yesterday, I understand that more references need to be downloaded from the ANNOVAR website before running the second perl script. This is currently being done and we should have the results soon.
Moving forward:
1. Mutect2 was unsuccessful for 6 crams from the 10k subset
When I submitted the job for the 10k subset, 6 jobs failed and errored out. The reminaing 9994 went through successfully. From the log files, it seems like the error is a samtools error:
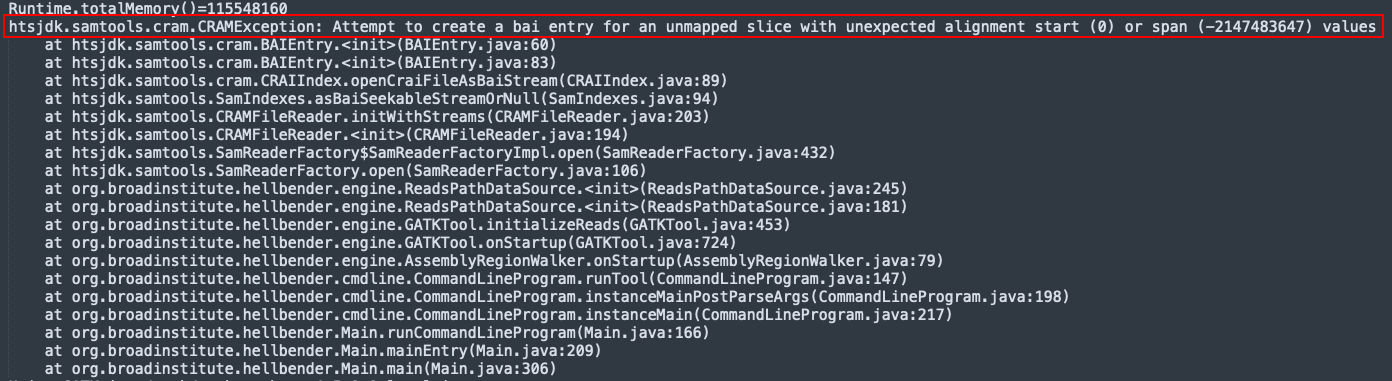
Further when computing the runtime for each of the samples, these 6 samples had an abnormally low runtime, as seen below. This makes sense because these jobs errored out pretty quickly.
| sample_id | runtime (mins) |
|---|---|
| Sample 1 | 0.05 |
| Sample 2 | 0.06 |
| Sample 3 | 0.08 |
| Sample 4 | 0.06 |
| Sample 5 | 0.07 |
| Sample 6 | 0.05 |
Potential fixes:
- Check the CRAM and CRAI files to ensure they are not corrupted
- Re run Mutect2 for these 6 samples alone - If they run successfully, then we will have to redo the filtering, indexing, merging and normalization steps to include these files with the current 10k results.
2. Download additional references for ANNOVAR
As mentioned before, additional references need to be downloadd in order to annotate the VCF. Using the below commands, the references may be downloaded from the ANNOVAR website.
perl /home/pvembu_stanford_edu/workdir/annovar/annotate_variation.pl -buildver hg38 \
-downdb -webfrom annovar <REFERNCE_NAME> annovar/humandb/
As next steps, we are also looking to generate scripts that will refine these variant calls and some resources have been shared post our meeting yeterday. We will be looking into them to see how these methods can be implemented and if they need to be modified to suit the needs of our data better.
Join the discussions here!